
A simple fix should require a simple solution, right?
Ground Rules:
There will be no chopping. Put the scissors down.
No taping
No pasting. Really, do I even need to say this about pattern corrections?
No copies needed. Put away the tracing paper!
Today's post is dedicated to pattern preservation for one of the easiest fixes to do: moving the position of a bust dart. The bust dart is one of those tricky elements. As a pattern maker, it's all about averaging the differences to get the right level. In other words, I try to get it right, but it's tough. Depending on what nature has endowed you with or how gravity has or hasn't affected you, bust dart levels can vary significantly. But the beauty of making your own clothes is that you have the power to perfect this.
Be sure to check out last weeks post on how to determine your bust dart position before we get started:
HOW TO MAKE SURE YOUR BUST DART POSITION IS CORRECT BEFORE YOU CUT
Are you back with me? Are we good on bust dart levels? Ok, then let's get started!
What you will need:
A see-thru graphic ruler. Guys, if you don't own one, run! Don't walk to add this to your arsenal.

It's so handy and I have a bajillion of these around (ok, maybe that's an exaggeration, but I have at least 7). I keep one always at hand for marking hems, welt pockets, adding seam allowances, and so much more!
As you'll see from the pics below, my rulers are workhorses. No pristine tools here because, boy, are they used a lot! (I tried to shine her up a bit for the pics with a little glass cleaner tho)
A marking implement. Maybe a pencil to start with, but once you get the technique down a pen or permanent marker can be used as well.
That's it.
Let's do this!
Scenario #1: You need to lower the bust dart 1"

1) Do a rough cut out of your pattern from the original layout, leaving a little extra paper at the dart area. You won't need much. Maybe an inch or two. In other words, don't cut out your pattern perfectly at the dart area.

2) Place your See-thru ruler on top of the top dart leg so that 1" of the ruler runs parallel below the dart leg. Draw a line that is exactly 1" below the apex point. Make sure this line is the same length as the original.
![]()

3) Place the See-thru ruler on top of the lower dart leg so that 1" of the ruler runs parallel below the dart leg. This should automatically intersect with the apex point. Draw a straight line from the apex point out. Measure the length to match to the same as the top dart leg length.

4) Put a mark that divides the dart legs (the dart depth).

5) Draw a line along the side seam from the armhole down to this mark.

6) From this mark, draw a line to the lower dart leg. This ensures that the fold of your dart will be pretty close to what it should be.

If this cuts into the bodice more than previously, from this new point, blend a line to the waist area. Don't worry, there's no science to this part. Just make it look like a pretty curve.
Scenario #2: You need to raise the bust dart 3/8" (1cm)
 1) Do the same rough cut out of your pattern as requested in scenario #1.
2) Place your See-thru ruler on top of the top dart leg so that 3/8" of the ruler runs parallel above the dart leg. Draw a line that is exactly 3/8" above the apex point. Make sure this line is the same length as the original.

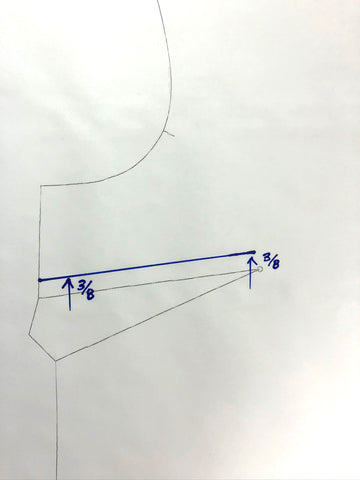
3) Place the See-thru ruler on top of the lower dart leg so that 3/8" of the ruler runs parallel above the dart leg. This should automatically intersect with the apex point. Draw a straight line from the apex point out. Measure the length to match to the same as the top dart leg length.


4) Put a mark that divides the dart legs (the dart depth). From this mark, draw a line to the lower dart leg. This "trues" the dart.

5) Draw a line along the side seam from the armhole down to this mark.

6) From the lower dart leg, blend a line to the waist area.

That's it! Pretty easy right?
Now, let's say that you have already sewn up your garment only to discover that the dart is in the wrong spot for you.
Crap!
Not to worry! Seam rip/ unpick the side seam from about 1" below the armhole to almost waist level. Take out the dart stitches and iron everything flat again.
Using a marking implement that will disappear, mark the original dart position and then apply the applicable revision as I have laid out above. Now, the dart overlap where you mark the center line between the legs (step 4) may not be perfect, but it should be workable enough to salvage your garment to save it from the UFO pile.
What do you think? Will this come in handy for you? I sure hope so.
Want to read more about pattern alterations? Check out these posts:
6 comments
I’m 80 and learned to sew on an old treadle 73 yrs ago. I could sew for everyone else, but have hacked up so many of my own patterns trying to do the full bust adjustment that I gave up sewing for myself over 30 years ago. I am following you now and hope you can as easily make the adjustment as you just did for lowering the bust tart. Thank you so much.
This was soooo helpful thank you!
Betsy, thank you – this makes it so easy. Love your posts!
I’ll try this solution as soon as I can. Thanks!
Very helpful! Thank you for sharing.